Data obfuscation
In this tutorial, we’ll go through how to use regex to build data obfuscation in QRadar. For a variety of organisational reasons, there may be instances when you need to disguise specific data entering your SIEM platform. For instance, it might be used to disguise PII (Personally Identifiable Information) data so that organisations operating in the EU can comply with laws like the GDPR (General Data Protection Regulation).
The following are some crucial reminders regarding Data Obfuscation in QRadar:
– Data obfuscation will only be used on data once the setting has been set up. All previously entered data will be kept in its original, unobscured form.
– You will need to alter your custom rule to account for this change if it depends on data that was previously unmasked but will now be disguised on your QRadar platform. If you set up a rule, for instance, that runs when the username field contains “Joe Blogs” and then obfuscate the username field, your rule will no longer run since QRadar cannot run rules on obfuscated data.
More information around Data Obfuscation in QRadar can be found here: Sensitive Data Protection
Scenario
For this test scenario, incoming events from a Windows client computer that has been configured to send its security logs to QRadar SIEM will be used. The specific event that will be used in this test scenario is Event ID 4624 (An account was successfully logged on), which is produced when you successfully log on to a computer. You can learn a tonne about a user’s login, their method of login, and their location by looking at this event. In our QRadar Lab, which is shown below, you can see an illustration of this occurrence and how it appears.

What would happen if, as a result of a policy requirement inside your business, we required to mask the username for every Windows Event ID 4624 originating from our test device. How could we set it up in QRadar?
Configuring Data Obfuscation
Understand the precise data you are attempting to conceal in Step 1. This is crucial because, especially when it comes to Windows logs, you need to know the precise data you wish to disguise. In our scenario, for instance, we want to hide the username field from the event. As you can see from the screenshot below, Account Name appears twice for Event ID 4624, so we must be careful to configure our Regex when writing it so that the right Account Name is hidden.

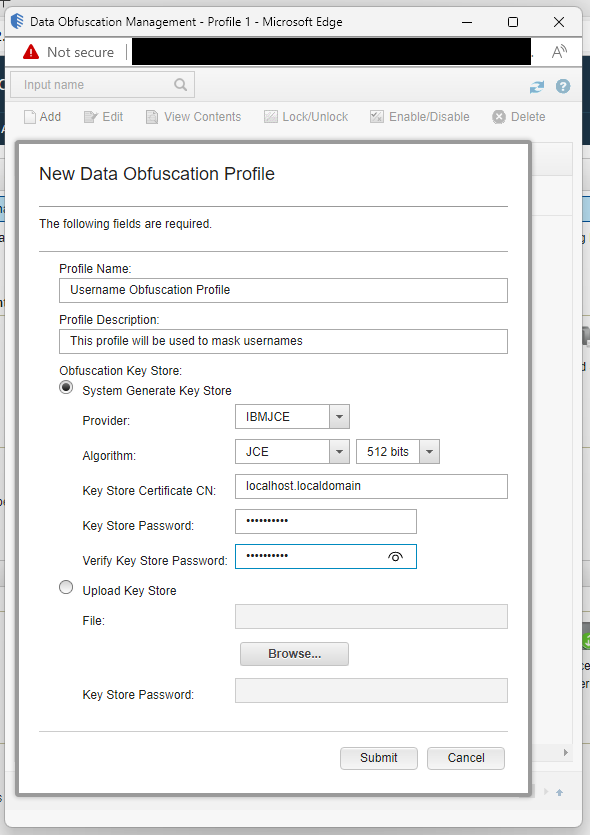
Next, navigate to the Data Obfuscation Management function, which is accessible from the Admin tab of the Data Sources section. A New Data Obfuscation Profile must be developed initially. You may picture a container as a data obfuscation profile. For instance, in our hypothetical scenario, we’ll create a profile named Username Obfuscation Profile and use it as a container to group all the Data Obfuscation Expressions for usernames.
As a result, in this scenario, we’ll mask the usernames coming from Windows Event ID 4624. However, if your organisation suddenly needed to mask usernames coming from your proxy server, you could do so by using the same profile and a new Data obfuscation expression. Better administration is possible because you can organise your data obfuscation expressions into groups that work for your business and decrease the number of key stores you need to keep up with.
An obfuscation key store must be generated during profile setup; the key store file can then be downloaded to the local system. It is advised to keep the key store in a different and secure area within your company. If you want to make modifications to the profile, you can unlock it using the key store. It can also be used to reveal the data you will be concealing with the profile, thus you must make sure that only authorised individuals can access the key store..


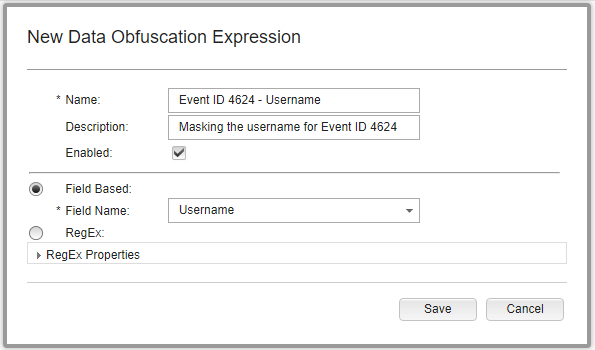
Open the newly created profile in Step 3 so that you may add a New Data Obfuscation Expression. Name the expression appropriately and describe the data the expression is attempting to disguise. In this example, we will call the obfuscation expression “Event ID 4624 – Username” to quickly identify the event and field from which we want to disguise data.

You’ll see that there are two choices for setting up related to obfuscation: field-based and regex. I haven’t used field-based obfuscation, but from what I hear, you can’t define the obfuscation of your data for a given log source, event name, or category if you use this method. As a result, if we chose Username from the Field Based menu, QRadar will obfuscate each and every event that parses username data into the Username field, which is definitely not what you want for your company. Therefore, for our case, we will configure the obfuscation of the username field for Event ID 4624 from our Windows machine using the Regex option. As seen in the image below, we can begin filling out the required information.

We must make sure the Regex is written to hide the Account Name from the New Logon section, as was described in Step 1, to guarantee that you are masking the proper Account Name (i.e., the person who logged onto the machine). Regex can be written in many different ways to achieve the same goal, but the key lesson here is to write it as effectively as you can because a poorly designed Regex could negatively affect the system’s efficiency. This Regex will be used to obfuscate the second Account Name in the New Logon section: \bNew Logon\b.+\bAccount Name\b:\s+([^\s]+)\s+\bAccount Domain\b
The Capture Group will remain at 1. This is due to the Regex only matching and collecting 1 piece of information (the username). If the Regex was intended to pick up, for example, both Account Names, and you needed to mask the second Account Name, you would set the Capture Group to 2 to indicate that.
In our example, the Microsoft Windows Security Event Log will be used as that is what Event ID 4624 is. Log Source Type specifies the type of log source you want the obfuscation to take place on. If your company, for example, only receives sensitive data from one particular log source and not from any others, it would make sense to just disguise the data from that log source. You can further filter the obfuscation for a certain Log Source as an option.
When we click Browse, a new window will open allowing us to search for the exact event name. The simplest way to do this would be to use the QID of the event, which you can find in log activity when you open a 4624 event. Here, we will choose the precise event we want the obfuscation to occur on. You can save the New Data Obfuscation Expression once each of these fields has been filled out.

Lastly, make sure your Obfuscation profile is turned on.

At this point, we’ll test to determine if the Event ID 4624 username can be masked by the obfuscation. To do this, all we need to do is lock our lab computer and open it once more, which will result in a string of logoff/logon occurrences. After logging back in, we open QRadar Log Activity and configure the filter to look at events from our lab machine, specifically event ID 4624. As a result, the following information should appear in the log activity:

The username for this event has been obscured, as you can see. Win11Lab1User was the initial account we used to connect on to our local lab computer. Compare the event in QRadar to the event in the lab machines Event Viewer to ensure that the events are actually obscured.

The Event Viewer log shows that the user Win11Lab1User logged into the WIN11LAB1 local machine. These specifics will, of course, stay in their original form in Event Viewer because that is where the event originated. To confirm the identical occurrence in QRadar, let’s additionally make a note of the Logon ID.


We can see from the raw payload of the event in QRadar that our earlier-implemented Regex Expression entirely masked the username that was used to log into the local machine WIN11LAB1. Additionally, we can validate that this is the same log from that computer by looking at the same Logon ID in the raw payload in QRadar, which corresponds with the Logon ID of the event we previously observed in Event Viewer.
The Key Store file and password we established at the start when configuring the Obfuscation profile can be used to deobfuscate the data. IBM Deobfuscation Guide provides detailed instructions on how to achieve this.Have a look at this easy-to-follow method for deobfuscation: IBM Deobfuscation Guide
